How to Create an Interactive Event Map
Planning an event - whether it's a festival, sports race, conference, or market - comes with one challenge almost every organizer faces: helping people find where to go. That's where a well-designed event map makes all the difference.
In this article, I’ll show you how to create your own interactive event map, using a real-world case from the Formula 1 Grand Prix in Monaco. Plus, we'll walk through the tools and best practices for building a custom map that works on both desktop and mobile.
What Is an Interactive Event Map?
An interactive event map is a digital map that shows the layout and locations of key features at your event, such as:
- Entrances and exits
- Seating zones or grandstands
- Food and drink stalls
- Emergency services
- Exhibitor booths
- Stages and activity zones
- Routs and directions
Unlike a static map image, an interactive map lets users zoom in, click for details, and even filter by category.
Why Use an Event Map?
A good event map helps you:
- Improve the attendee experience
- Reduce staff workload (fewer repetitive questions)
- Prevent confusion and crowding
- Increase time spent at your event areas
- Promote vendors and sponsors via clickable map points
And if your map is embeddable or shareable, it also helps spread awareness before the event.
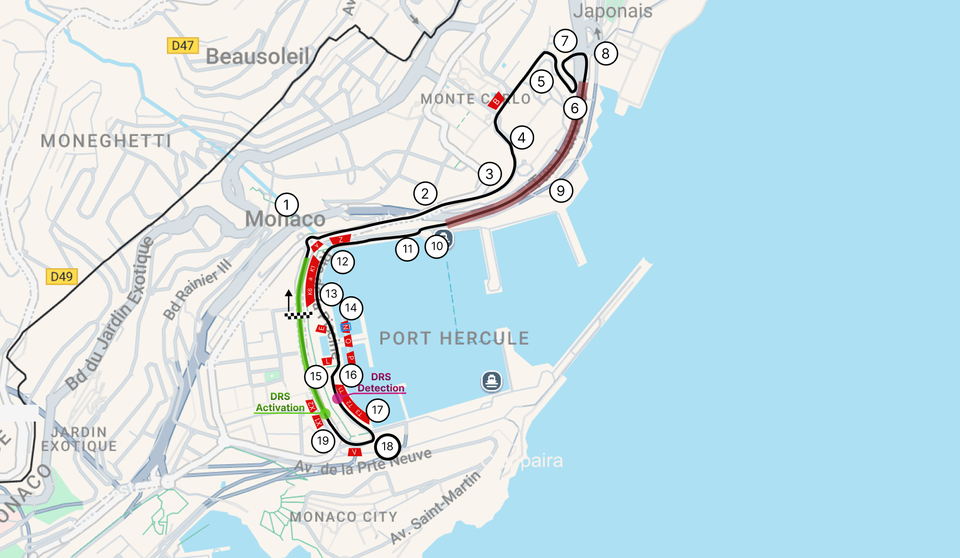
Real Example: Formula 1 in Monaco
Let’s take the iconic Formula 1 Grand Prix in Monaco as a case study.
Organizers need to communicate dozens of key locations on a very dense city circuit. On their custom event map, they include:
- Grandstands (with seat numbers and access points)
- DRS Activation Zones and DRS Detection Points (important for fans and teams)
- Hospitality areas and VIP zones
- Pit lane, paddock, and track layout
- Entry gates and metro stations
An interactive map lets spectators explore the circuit layout ahead of time, find their seats faster, and plan their day around the race.
Want to create something similar? Let’s break it down.
How to Make Your Own Event Map
You can build your own interactive map in just a few steps:
1. Choose a Tool
Here are some beginner-friendly tools that don’t require coding:
- MakeMyMap - Designed for events, creators, and small teams. Free plan available.
- Google My Maps – Great for basics but limited in design.
- Atlist – Modern UI with filters, perfect for business use.
- MapHub – Minimalist and free, ideal for simple maps.
2. Start with a Base Map
Decide if your event needs a city layout (like a marathon) or a venue-level plan (like a music festival).
Upload a custom background image or use OpenStreetMap/Google Maps as a base.
3. Add Key Points
Mark the following:
- Check-in points
- Activity zones
- Food trucks, toilets, first aid
- Parking and shuttle stops
Pro tip: Use icons and categories to make the map scannable.
4. Add Descriptions and Links
Each point should include:
- Title
- Description
- Hours (if relevant)
- External links or contact info
For example: “VIP Lounge – Access with gold wristband only. Open 12:00–18:00.”
5. Share and Embed
Once ready, you can:
- Share a public link in emails and social media
- Embed the map on your event site
- Print a QR code version for posters
Many tools also support mobile-optimized viewing.
Bonus Tips for Better Maps
- Use color-coded icons for clarity
- Group places into filters (e.g. “Food”, “Stages”, “Info”)
- Include a legend and map title
- Add a search bar if the map has 20+ locations
- Update it live in case of changes during the event
With tools like MakeMyMap, you can design your event map in minutes — and make it look like it was built by pros.
Create your free event map now → makememap.com